

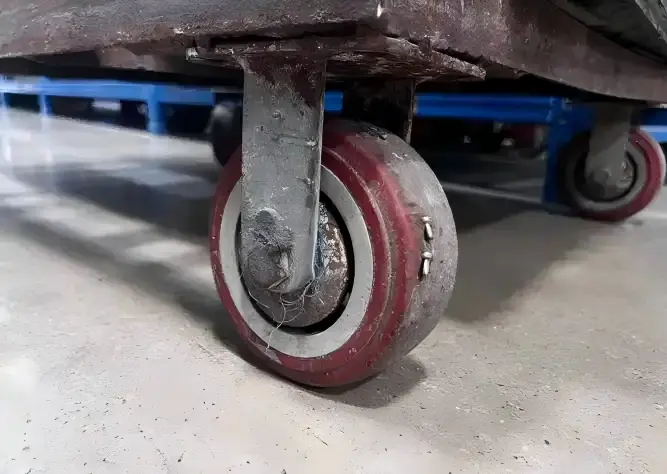
In AGV and AMR travel systems, the drive wheel is responsible for traction, steering, and positioning, making it an important part of routine maintenance. However, many problems encountered during long-term operation, including deviation from the intended path, abnormal noise, increased pushing resistance, and unstable braking, are not necessarily caused by the drive wheel alone.
As auxiliary support and free-moving components, casters also have a direct influence on vehicle posture, load stability, and running smoothness.
Therefore, AGV maintenance should cover both the drive wheel and auxiliary casters. Stable performance from both components helps the vehicle maintain smooth, reliable, and low-maintenance operation over time.
This guide covers caster installation, inspection, lubrication, braking, cleaning, troubleshooting, replacement, and end-of-life recycling. It can serve as a practical maintenance reference for AGV and AMR manufacturers, system integrators, and end users.
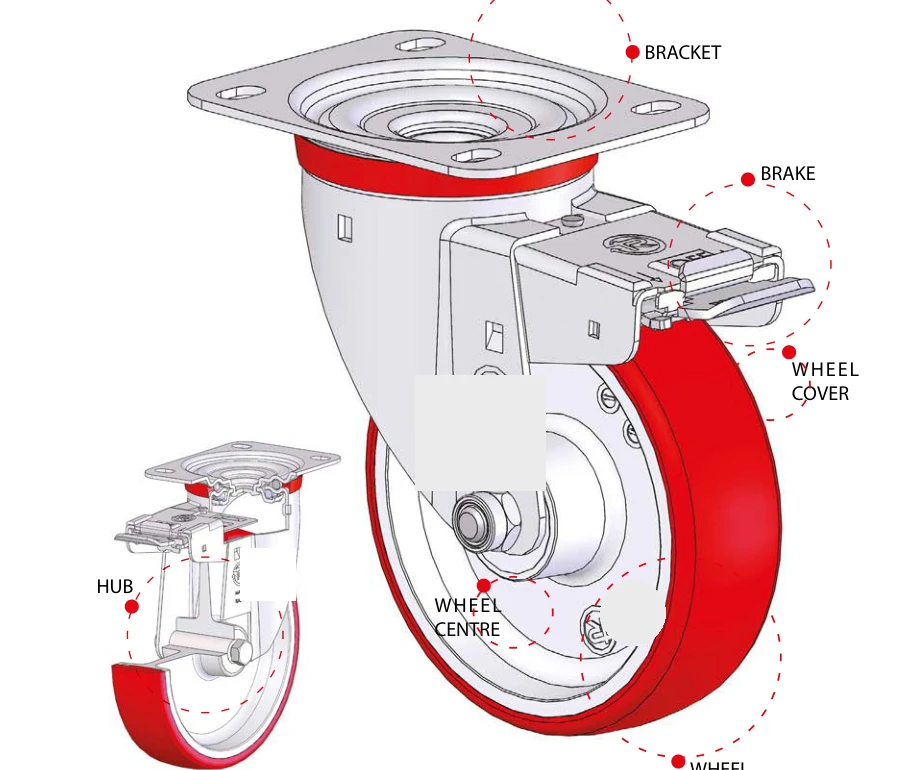
Figure 1. Main caster components - the bracket, wheel, brake, and hub are key maintenance areas.
1. Installation: Proper Assembly Is the Starting Point for Caster Service Life
Caster installation involves more than simply tightening the mounting hardware.
Before installation, inspect the axle assembly, nuts, washers, and other connecting components. Their mechanical strength and specifications must be suitable for the required load and mounting configuration.
Caster mounting structures generally include cantilever and fork-type designs. The requirements for the axle assembly vary between these configurations, so components should not be interchanged without verification.
The axle assembly must be installed horizontally and perpendicular to the direction of travel. An appropriate anti-rotation method should also be used.
After installation, tighten the axle nut to the specified torque and check that the wheel rotates smoothly without binding.
For AGV assembly and production, the following items should be included in the caster installation checklist:
Horizontal axle installation
Axle perpendicular to the direction of travel
Effective anti-rotation arrangement
Fasteners tightened to the specified torque
Free wheel rotation confirmed after assembly
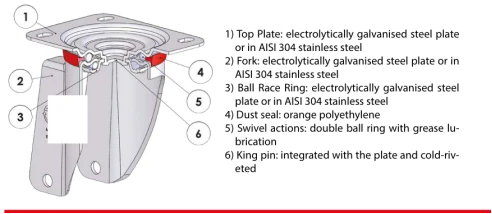
Figure 2. Sectional view of a swivel caster assembly: top plate, fork legs, ball race, dust cover, and kingpin.
The mounting bracket also requires careful installation.
The AGV frame must have sufficient rigidity to support the caster. The mounting surface should be flat and level, and all caster mounting surfaces should be on the same plane.
Welding is generally not recommended. Use the mechanical fastening method specified by the caster manufacturer.
For top-plate mounting:
Use the specified number and size of bolts, nuts, and washers.
Tighten the nuts or bolts to the specified torque.
Make sure the axle of a directional caster is perpendicular to the direction of travel.
When a solid stem is installed into a tubular structure, ensure the correct mating tolerance.
For stems with cross holes, use bolts with the correct diameter and length.
Ensure the tubular mounting structure is fully seated against the mounting surface.
Do not allow debris or foreign material to remain between the mounting surfaces.
For threaded stems and bolt-hole brackets, ensure the mounting surface fully contacts the equipment.
Use mounting bolts with the diameter specified by the manufacturer.
An uneven mounting surface, trapped debris, or insufficient fastening torque can lead to premature caster wear and may affect AGV straight-line stability.
2. Inspection: Adjust the Maintenance Interval to the Application
Caster maintenance should follow a planned inspection schedule based on actual operating conditions.
For heavy-load, high-cycle, high-temperature, humid, corrosive, or dusty applications, inspection intervals should be shortened.
Caster inspection can be incorporated into the same maintenance program used for AGV drive wheels, allowing both components to be tracked through a unified maintenance record.
Routine inspection should cover:
Vehicle frame damage, cracks, or deformation that could affect caster mounting.
Loose connections between the caster and vehicle frame.
Excessive play, abnormal wear, deformation, tearing, or other caster damage.
Brake and locking mechanism operation.
Oxidation, corrosion, and foreign material accumulation.
Wheel tread condition and electrical conductivity for anti-static or conductive casters.
Axle assembly tightness and specified torque.
Lubrication condition of moving components.
Table 1. Maximum Recommended Inspection and Maintenance Intervals
| Inspection Item | Maximum Interval | Description |
|---|---|---|
| Vehicle frame damage | 12 months | Check cracks, deformation, and weld condition |
| Mounting connections | 6 months | Check caster-to-frame fasteners |
| Overall caster condition | 6 months | Check play, wear, deformation, and tearing |
| Brake performance | 3 months | Check parking reliability and pedal return |
| External condition | 6 months | Check oxidation, corrosion, and debris |
| Electrical conductivity | 3 months | Anti-static/conductive casters only |
| Axle assembly tightness | 6 months | Retighten to specified torque |
| Lubrication | 6 months | Re-grease after every cleaning |
3. Lubrication: Separate Swivel and Wheel Bearing Maintenance
The swivel assembly is one of the main areas requiring periodic lubrication. It consists of the upper and lower ball races that allow the caster to rotate.
Heavy-duty and shock-absorbing caster brackets equipped with a grease fitting can be lubricated through the fitting, which supplies grease to the internal swivel ball assembly.
Light- and medium-duty stamped brackets without a grease fitting are normally factory-lubricated and sealed. They generally do not require routine greasing.
If the swivel becomes difficult to rotate or begins to bind, the bracket should be replaced or inspected by qualified personnel.
Figure 3. Grease fitting on a heavy-duty or shock-absorbing caster bracket for lubricating the swivel ball assembly.
A multi-purpose mineral-oil-based grease with lithium soap thickener and NLGI Grade 2 consistency is recommended.
Avoid mixing greases with different brands, base oils, or thickener systems. Incompatible greases may reduce lubrication performance or cause other problems.
The normal lubrication interval is approximately 6 months. However, the actual interval should be determined according to the operating environment.
Continuous operation, high temperatures, humidity, dust, and corrosive conditions require more frequent lubrication. Clean indoor environments with intermittent operation may allow longer intervals.
Important: Re-grease the caster after every cleaning operation. Water or cleaning agents remaining in the swivel assembly can remove or reduce the effectiveness of the original grease.
For wheel bearings, the ball bearings installed in the caster wheels are normally factory-pre-lubricated with a compatible grease. The commonly used configuration is a 2Z double-shielded bearing.
Additional grease should not normally be applied to the axle during assembly.
Where the bearing design permits service, the external metal shield can be removed for maintenance. If the shield is damaged during removal, it must be replaced.
After maintenance, always restore the caster to its original assembly condition.
4. Braking and Locking: Secure Parking and Reliable Release
Caster braking systems use a foot pedal to hold the vehicle in place. Depending on the caster design, configurations may include wheel-lock, directional-lock, total-lock, or combined locking systems.
During inspection, verify that:
The pedal operates smoothly.
The brake engages securely.
The pedal returns completely after release.
Figure 4. Front brake assembly.
The brake clamping force can be adjusted using an M8 hex socket screw with a 13 mm wrench.
Adjustment should take into account wheel hardness, wheel wear, and actual operating conditions.
If the clamping force is too low, the caster may not hold the vehicle securely. If it is too high, pedal resistance may increase and abnormal wheel wear may occur.
After adjustment, verify brake performance under the actual operating conditions.
For braking systems installed on electric welded caster brackets, the brake is designed for parking on level surfaces.
If the brake pad is excessively worn, the spring has failed, or the pedal is deformed, replace the corresponding brake assembly.
5. Cleaning and Storage: Avoid Damage During Cleaning
Regularly remove hair, fibers, chips, debris, oil, and other contaminants from the wheel tread, fork legs, and swivel assembly.
Clean the caster with a damp cloth or neutral detergent.
Do not use strong acids, strong alkalis, aggressive solvents, or other chemically corrosive cleaning agents. These substances may damage the wheel material, seals, protective coatings, or plated surfaces.
After cleaning, re-lubricate the caster according to the specified lubrication requirements.
For storage, keep casters in a well-ventilated and dust-free environment without excessive moisture.
The recommended storage temperature is between -10 °C and +40 °C.
Avoid prolonged exposure to direct sunlight. Long-term storage should generally be avoided where possible.
Casters are normally supplied in standard shrink-wrap packaging for dust protection. The original packaging can be retained during storage.
6. Common Caster Problems and Troubleshooting
| Symptom | Possible Cause | Recommended Action |
|---|---|---|
| Heavy or difficult swiveling | Insufficient grease; damaged dust cover; worn ball race | Grease through the fitting; replace dust cover; replace bracket if severely worn |
| Increased rolling resistance | Foreign material on wheel; damaged bearing; loose axle | Remove debris; inspect or replace bearing; retighten axle |
| Bracket wobble or excessive play | Loose kingpin/riveted joint; damaged ball race | Stop operation and replace the bracket |
| Brake does not hold | Worn brake pad; incorrect clamping force; failed spring | Adjust M8 screw; replace brake assembly or spring |
| Abnormal operating noise | Insufficient grease; loose fasteners; foreign material | Lubricate and retighten; remove debris |
| Wheel chipping or cracking | Overload; excessive temperature; chemical corrosion; aging | Replace wheel and verify load and environmental conditions |
| Rust or corrosion on metal parts | Damaged protective coating; moisture or corrosive environment | Clean and apply corrosion protection; replace if severely corroded |
| Increased resistance of conductive caster | Oil, dust, or dirt on wheel tread | Clean the tread; replace wheel if necessary |
7. Spare Parts, Replacement, and Recycling
When replacing caster components, use original spare parts with specifications matching the original product.
Important specifications include:
Wheel diameter
Wheel width
Bearing configuration
Top-plate hole spacing
Brake type
Using incompatible spare parts may change the caster's load capacity, braking performance, and mounting dimensions and may also affect warranty coverage.
After replacing a wheel, tighten the axle nut to the specified torque. Confirm that the wheel rotates freely without excessive runout.
After replacing a caster bracket, secure it according to the original mounting requirements.
Following any disassembly or reassembly, restore the product to its original assembly condition.
Perform an unloaded test run and confirm normal operation before returning the AGV to service.
When a caster reaches the end of its service life, remove it from the equipment and separate it into the bracket, axle assembly, and wheel for material sorting and recycling.
Steel, stainless steel, and cast iron components can generally be recycled as ferrous scrap. Aluminum alloy components should be recycled as non-ferrous metals.
Plastic, thermoplastic rubber, and vulcanized rubber components should be separated from metal parts and handled according to the applicable recycling category.
Thermoset resin and polyurethane components should also be separated from metal and handled according to local disposal requirements.
Shrink-wrap packaging can generally be recycled as low-density polyethylene. Wooden pallets can be reused or recycled, while paper and cardboard packaging can be sent to normal paper recycling streams.
All recycling and disposal procedures should comply with the waste-management requirements applicable in the region where the product is used.
Conclusion
Reliable AGV operation depends on the combined performance of the drive wheels, auxiliary casters, vehicle frame, and braking system.
For AGV and AMR travel systems, maintenance should not focus on the drive wheel alone. Auxiliary casters also require proper installation, regular inspection, correct lubrication, and timely replacement.
Including casters in the overall AGV maintenance program helps support smoother operation, longer component service life, and more reliable vehicle performance.


